HELPFUL VIEWING HINTS

Each picture is available in a larger format simply by clicking on the picture. We encourage comments and questions. Any comments made will be reviewed by the administrator prior to posting. Enjoy!

Saturday, May 1, 2010

April Wrap Up


The close of April saw the engine compartment nearing completion, with a few extra touches thrown in for good measure.  The tail feathers are all mounted, new control cables installed, and all work in the tail section and on the wings complete.  Nearly all the work from here on out is in the cockpits and we're looking to get the plane back in the air in mid-May.


ENGINE COMPARTMENT
Nose case breather with hose attached that will port at the bottom of the firewall.  This keeps the engine compartment clean during any unloaded aerobatics.

We decided to polish the metric fittings in the engine compartment to compliment the other work here.  Khera, our Director of Maintenance, said "this is the most beautiful firewall forward we've ever done."  I'd have to agree!

CONTROL SURFACES
Tail feathers installed....bell cranks stripped, inspected, and primered, and all new hardware used on the installation.

Progress through 4.21.10

It is slowly starting to look like an airplane again.  Nearly all of the fabrication is complete, so now it is mostly down to wiring and assembly.  The "to do" list is growing shorter ever week...

COSMETICS
Gill shutters painted gloss black and installed.

Main air bottle painted gloss black and installed.  

CONTROL SURFACES
Rudder with electric trim is test fit...all the control surfaces are ready for installation.  This aircraft is getting 3 axis electric trim, which is a nice feature that allows trimming of the aircraft hands off for any speed and configuration, as opposed to the one speed and configuration with the stock trim tabs.

SHEETMETAL
This is part of the baggage compartment.  The door shown here allows easy access to a US standard APU port which is wired to allow both full aircraft power, and trickle charge the batteries.

Front and rear right side panels cut and ready for powder coat.

Flap well complete

This time the pictures to tell the whole story....

Week of 4/5/10 Progress

ALL THE LITTLE DETAILS....

People are often surprised when they find out how many hours of labor  go into one of our restorations (1000-2500 depending on the depth of the restoration).  Well, it's all the little details, and they all take time.  A good example is a pushrod boot.  The frame is removed, all the rivets are drilled out, the boot removed, the new boot fabricated, riveted into place and the bracket reinstalled.  Repeat this type of work on literally 100's of items on the aircraft, and you begin to understand how involved this level of work is.  Are we crazy to do this type of work on CJ's?  Probably, but we feel that's the only way to do it!


FLAP BAY
Rollers for the bungee chord (which keeps the flap retracted) removed and overhauled.

More flap bay detail showing everything installed including new bungee chord, Cad plated hardware, and new bonding straps.

Here's another example of time consuming detail.  All the throttle quadrants are removed, disassembled, stripped, sanded, painted, reassembled, and reinstalled.  It's this level of detail that sets us apart....

POWERPLANT 
Overhauled oil cooler installed.

Hub overhauled and painted, ready for installation.

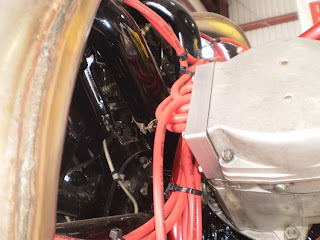
These two pics are sideways, sorry.  This is our custom ignition harness installed.

LANDING GEAR
Overhauled MLG uplock installed.
Cad hardware installed on landing gear leg and lower gear door.

Thursday, April 1, 2010

March Progress wrap

As we close out the month of March, things are coming together nicely on the aircraft.  Overall most of the cosmetic detail is now complete, the engine compartment is nearing completion, basic airframe wiring is nearly complete, canopies are nearly complete, wings are complete, control surfaces are complete, and we're shooting to have the plane ready to run in 2-3 weeks.  Most of the work that remains is avionics and cockpit wiring....

COSMETICS
Flap bay before detail....

...flap bay after detail.
In addition to the paint, all hardware and linkages are removed, cleaned, inspected, and reinstalled with fresh lube.

Left side panels of both cockpits stripped, and cover plates riveted into place to clean up appearance and holes left by removed components.


ENGINE
Original ignition harness...

...new WW ignition harness with highest quality available racing wire, machined brackets, and cleaned rotor caps.

Machined bracket installed on magneto and wires routed.

Engine with harness installed.  Plugs are iridium...widely available, cheaper, and a much better spark for smoother and foul free operation.

Engine compartment right side with stainless steel exhaust permanently installed, and most hoses also installed.

Engine compartment left side with new oil hoses installed.

CANOPIES
WW exclusive one piece rear slider nearing completion.  We fabricate all new metal strips for a show quality finish.  

Wednesday, March 17, 2010

Week of 3/8 Progress

Lots of progress this week with the engine being completely reassembled, new ignition harness installed, gear painted, flap bay primed, wheels and new tires installed, landing gear mechanisms overhauled, adn the wing attach hardware inspected, cleaned and reinstalled...

ENGINE

All the push rod tubes have been chromed and reinstalled using fresh Cad plated hardware.  The dress kit on this engine has provided really nice results...we hope to do more of these in the future as we continue to take CJ's to the "next level."

LANDING GEAR SYSTEM
One of the main gear uplocks completely disassembled before cleaning, inspecting, and reinstalling.

Uplock reassembled and reinstalled.

Overhauled Microswitch installed.

Right main painted.

Nose gear painted.


Wheels painted.  All new tires and new US nose wheel assembly ready for installation.

AIRFRAME
Khera working in the flap bay.  Flap bay has been primered and is ready for paint.

Forward Spar attach bracket wing side removed, cleaned, inspected and ready for reinstallation.

Sunday, March 7, 2010

Week of 3/1

Progress is being made in several areas on the aircraft....

ELECTRICAL
Brandon takes what you see above....

...and turns it into this artwork.  This is time consuming work, but the results are unmatched!  (the black plastic zip ties are temporary)

FUEL TANKS
The fuel bays are primered and ready for final prep before the tanks get installed.

ENGINE
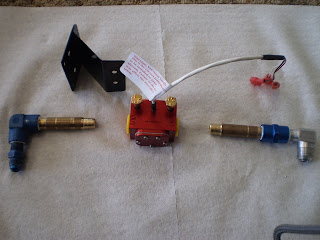
This is the fuel flow transducer prior to installation.

Fuel flow transducer installed in background....intake oil drain installed in foreground.

COSMETICS
Shutters are painted gloss black and ready for installation.

Header tank painted, new rubber mounting straps installed, and ready to go back in the aircraft.